Advanced Approval in Salesforce Revenue Cloud
Use Case Overview
- Threshold for Approval:
- If the Quote’s Grand Total is ≥ $500,000, it requires approval from the Pricing Manager.
- Auto-Approval:
- If all Quote Line Items have a discount of ≤ 5% and no lines exceed this threshold, the Quote should be auto-approved.
- Moderate Discounts:
- If any Quote Line Item has a discount between > 5% and ≤ 10%, it requires approval from the Pricing Manager.
- High Discounts:
- If any Quote Line Item has a discount > 10%, it requires approvals from the Pricing Manager, Pricing Analyst, and the CEO.
Creating a Flow to Run in the Background
The process begins with creating a flow that performs the following:
- Assign Variables: Store the values required for your Approval Orchestration Flow.
- Update Quote Status: Dynamically update the Quote’s Status upon submission, approval, or rejection.
Step 1: Define Variables
- Grand Total Variable: This variable will hold the Quote’s Grand Total.
- Collection Variables:
- Store Quote Line Items with discounts < 5%.
- Store Quote Line Items with discounts ≥ 5% and < 10%.
- Store Quote Line Items with discounts > 10%.
Step 2: Build an Auto-Launched Flow
To create the automation:
- Start with the Quote:
- Create a text variable named recordId.
- Use the Get Records element to retrieve the Quote being evaluated, based on recordId.

Step 3: Save the Quote Record
After using the Get Records element:
- Option: Select “Only the first record”.
- Fields to Store: Select “All fields” so you can reference any required field from the Quote in subsequent steps.
Step 4: Create a Number Variable
- Variable Name: GrandTotal
- This will hold the Grand Total value of the retrieved Quote.
- Assignment: Use an Assignment element to set the GrandTotal variable to the value of the Quote’s Grand Total field.
- Set Variable: GrandTotal = [Quote].SBQQ__GrandTotal__c

Step 5: Add a Decision Element to Evaluate the Update Type
- Create a Text Variable:
- Name: UpdateType
- Purpose: This variable will hold the type of update being evaluated (e.g., “Submitted,” “Approved,” or “Rejected”).
- Add a Decision Element:
- Name: Evaluate Update Type
- Configure the element to evaluate the value of the UpdateType variable.
- Outcome Conditions:
- Submitted: UpdateType Equals “Submitted”
- Approved: UpdateType Equals “Approved”
- Rejected: UpdateType Equals “Rejected”
- Default Outcome: If none of these matches, you can handle it as an error or unexpected scenario.
Next Steps After the Decision
- Based on the decision outcome:
- For Submitted, you might update the Quote’s status to “In Approval Process.”
- For Approved, update the status to “Approved” and trigger downstream processes.
- For Rejected, update the status to “Rejected” and notify relevant stakeholders.

Your flow should look like this:

On the Approved path, add an Update element that changes the Quote’s Status to Approved:

On the Rejected path, add an Update element that changes the Quote’s Status to Rejected (configure it the same way you just configured the element for Approved, entering “Rejected” in the Value field).
On this same path, add an Action element that unlocks the Quote record. Select the “Lock Record” action:

On the Submitted path, add an Update element that changes the Quote’s Status to Submitted.
On the same path, add a Get element to retrieve the Quote Line Items:

Add a Loop element and for each record, decide what level of discount is on the record. Add each record to a collection variable for the appropriate level. For example, if the discount is less than or equal to 5%, add it to a collection variable for 5 or Less:


This is the entire flow, which I saved with the name Approval – Quote Update:

You’ll use it in another flow to update the Quote’s Status, unlock a rejected record, and use the variables you created for Grand Total and record collections.
Create an Approval Orchestration Flow
Create a new flow from scratch and select Autolaunched Approval Orchestration.

This type of flow allows you to add Stages for the approval flow, Steps to take at each stage, and Decision elements to create different paths.
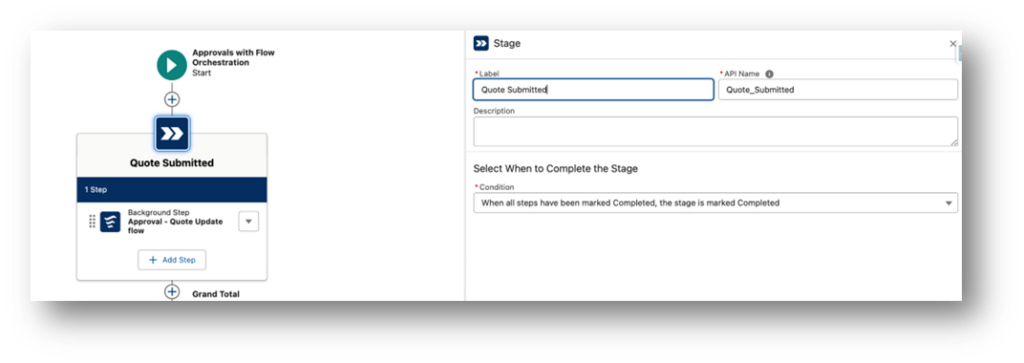
Click the + sign to add a Stage and name it Quote Submitted. (Later, we’ll create a Submit for Approval button on the Quote object, which will trigger this flow when it’s clicked.)

Set the element to complete when all steps are completed. This will be true in all the Stages we add.
Click the Add Step button in the Stage element. This gives you a choice of Approval Step or Background Step. Select the Background Step.

I selected the first flow we just created as the Action to run and used its name in the name of the Step. I set the condition to start the step when the Stage starts:

Scrolling down in the Step, I see a list of all the variables in my Approval – Quote Update flow. I can toggle them on if I want to use them. I toggled on the variables for GrandTotal and recordId, and created variables in this flow with the exact same names as the variables in the Approval – Quote Update flow (the names must match). And for this action, I entered “Submitted” as the UpdateType.

Next, I add a Decision element to evaluate the Grand Total:

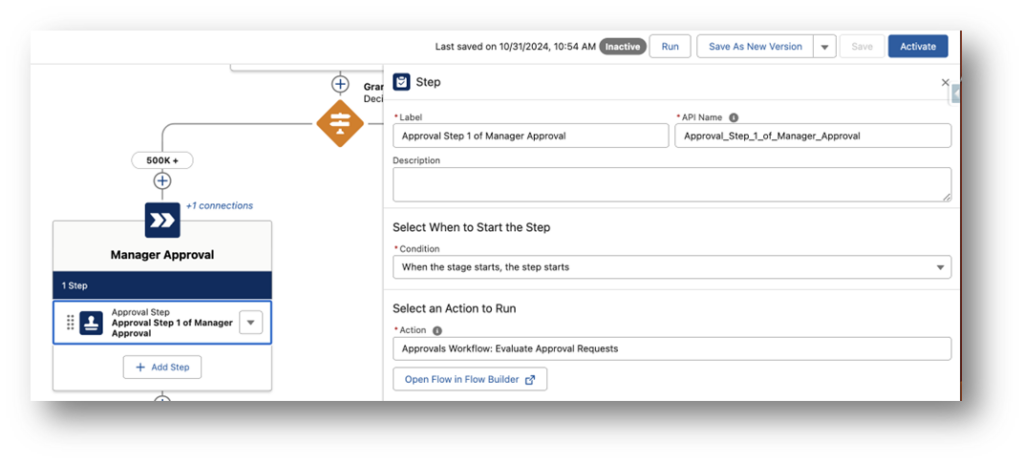
Because the Quote needs Pricing Manager approval if the total is >= $500,000, I add a new Stage to the first decision path. I name it Manager Approval, and this time I add an Approval Step (not a Background Step):

For the Action, I select Approvals Workflow: Evaluate Approval Requests, which is a flow that comes OOTB. This is the screen flow that lets the approver approve or reject the Quote and add a comment. It looks like this:

Scrolling down from the Action in the Approval Step, I set values as below.

Approver Type and Configuration
Approver Type Options:
- The Approver Type can be User, User Resource, Group, Group Resource, Queue, or Queue Resource.
- If you select one of the Resource options, you must create a variable for it.
Current Configuration:
- In this setup, I selected User and populated the lookup field with the desired user for testing purposes.
Recommendation:
- Avoid selecting User, Group, or Queue directly, as it limits the portability of the flow to another org.
- Instead, create a variable and select User Resource, Group Resource, or Queue Resource.
- If using a resource type, you will also need to:
- Use a Get Records element to fetch the relevant record.
- Assign the value to your variable.
Additional Flow Configuration:
- I pass in the recordId and configure this step to lock the record while allowing the approver to edit it.
- The Approval Chain Name is defined as “Manager”.
Decision Element for Quote Approval
Next, a Decision element evaluates whether the Quote is approved.
Outcome Setup:
- Approved: Evaluate the conditions to check if the Quote has been approved.
- Not Approved: Evaluate the conditions for cases where the Quote is not approved.
Finding that Resource value is tricky. Click into the field and select the Manager Approval Orchestration Stage:

Then select the Approval Step in your Stage (from the Orchestrated Steps):

Then select Outputs:

And finally, select Approval Decision:

With that resource selected, you can now finish the decision outcome by defining equals Approve. → It is not “Approved” .

Name your Default Outcome “Rejected.” From the Decision element, add two new Stages, one for Approved and one for Rejected

Background Step Configuration
For each stage (e.g., Approved, Rejected), include a Background Step:
- Action:
- Select your Approval – Quote Update as the action.
- Variable Configuration:
- recordId: Pass the recordId variable from the flow.
- UpdateType:
- For the Approved stage, set the value to “Approve”.
- For the Rejected stage, set the value to “Reject”.
Note: Ensure the UpdateType values align with those used in your Approval – Update Quote flow for consistency.
Configuring the Orchestration for Quote Line Item Discounts
After completing the Approved Stage, add a Decision Element to evaluate the Quote Line Item discounts.
- Decision Element Name:
- Evaluate Quote Line Item Discounts
- Outcomes:
Each outcome corresponds to the conditions defined for the collection variables:- Discounts < 5%: Evaluate if there are any Quote Line Items in the collection with discounts less than 5%.
- Discounts ≥ 5% and < 10%: Check for Quote Line Items in the collection with discounts between these thresholds.
- Discounts > 10%: Verify if any Quote Line Items in the collection have discounts greater than 10%.

Configuring Auto Approval for Discounts ≤ 5%
- Decision Path for Discounts ≤ 5%:
- This outcome is true if:
- The record collection for 5 or Less is not empty, and
- The record collections for 5 to 10 and 10+ are empty.
- This outcome is true if:
- Auto Approval Stage and Background Step:
- Add a new Stage for Auto Approval.
- Add a Background Step to the stage, configured the same way as the Manager Approval Stage and Step.
Note: While it is possible to link this decision path directly to the Manager Approval Stage, a separate Auto Approval Stage is added for clarity to ensure that anyone reviewing the flow can clearly understand the decision outcome.
Configuring the 5 to 10 Outcome
- Decision Path for Discounts ≥ 5% and < 10%:
- This outcome is true if the record collection for 5 to 10 is not empty.
- Linking the Path:
- Link this decision path directly to the Manager Approval Stage.
Configuring the 10+ Outcome
- Decision Path for Discounts > 10%:
- This outcome is true if the record collection for 10+ is not empty.
- Pricing Analyst Approval Stage:
- Add a new Stage named Pricing Analyst Approval.
- Add an Approval Step in this stage.
- Approver Configuration:
- Select the user to approve the Quote at this stage.
- If deploying the flow to another org, use User Resource, Group Resource, or Queue Resource for the Approver Type to ensure portability.

Final Decision Element: Evaluate Approver’s Decision
- Add a Decision Element:
- This element evaluates whether the Pricing Analyst approved or rejected the Quote.
- Configuration:
- Configure the Decision element in the same way as for the Manager Approval, with conditions to check if the Quote has been approved or rejected.
- Approver Resource Configuration:
- Ensure the Resource selection starts with the Orchestration Stage named Pricing Analyst Approval.
This step ensures the flow properly evaluates the decision outcome at the Pricing Analyst Approval Stage and transitions accordingly based on whether the Quote is approved or rejected.

From each Decision outcome path (Approved or Rejected), you can link the element back to the Approved/Rejected Stages earlier in the flow

Setting Up Parallel Approvals
- Current Setup:
- The flow is configured for serial approvals, meaning the Manager approves first, followed by the Pricing Analyst, if required.
- Configuring Parallel Approvals:
- To allow both the Pricing Analyst and the CEO to approve at the final stage:
- Navigate to the Pricing Analyst Approval Stage.
- Click the Add Step button within the stage.
- Select the CEO as an additional approver.
- To allow both the Pricing Analyst and the CEO to approve at the final stage:
- Resulting Behavior:
- The Pricing Analyst and the CEO will receive approval tasks simultaneously.
- Both must approve the Quote for it to proceed.

Parallel Approval Setup: Final Stage Configuration
- Record Locking:
- Note that Lock the record is not selected for this step.
- This is because the record is already locked during the Pricing Analyst step.
- If Lock the record is selected here, it will result in an error.
- Updating Approval Chain Name:
- I gave this approval chain a different name and updated the Stage name to Pricing Analyst/CEO Approval to reflect the parallel approval process.
Updating the Decision Element for Parallel Approval
- Update the Decision Element:
- In the Decision element, update the conditions to reflect the parallel approval setup.
- Select the output from the CEO Approval step to evaluate whether both the Pricing Analyst and the CEO have approved the Quote.

I also change the default outcome’s name back to Default Outcome and add a new Outcome; I want to be sure the approval is rejected if either the pricing analyst or the CEO rejects it.

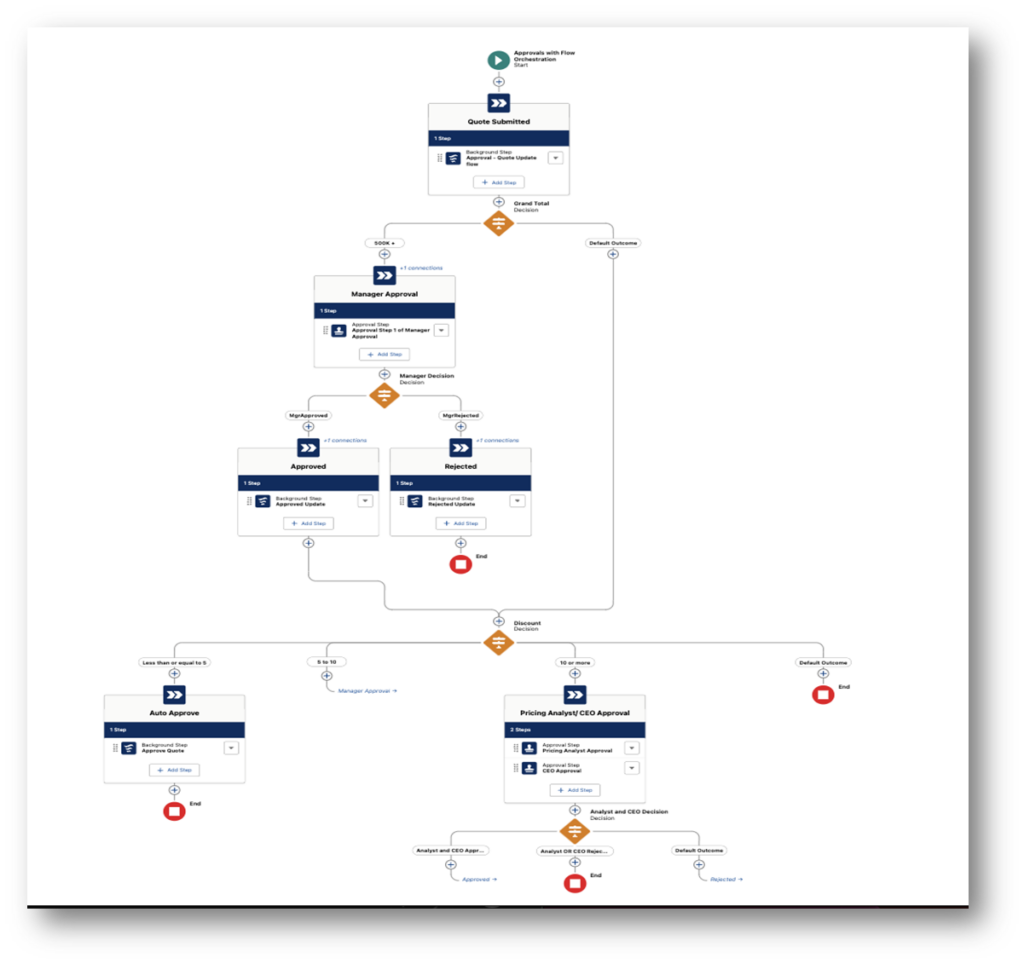
The final flow looks like this:

Obviously, you can make this as complex as you like. For example, you can create a subflow that sends an email notification to your users and call that in a step. If you’ve gotten this far, you know how to configure whatever you need to
Create the Submit for Approval Button and Update the Quote Page Layout
You’ve probably created a button before; just open the Quote object in Setup, and click on Buttons, Links, and Actions on the left-side menu.
- For Action Type, select Lightning Web Component.
- Select the LWC you just created.
- For Label Type, leave it at None.
- Enter the Label: Submit for Approval
- Save
Now update the page layout by dragging the button to the Mobile and Lightning Actions.
Back on the front end, click on a Quote record and select Gear Icon > Edit Page to enter the Lightning Page Editor.
In the Highlights Panel, add an Action and select “Submit for Approval”.
Add a new Tab and name it Approvals (a custom name).
Drag the Flow Orchestration Work Guide component to the new tab. This displays the Accept/Reject/Comments window in the approval screen flow you added to your orchestration flow.
Add the Approval Trace component to the tab underneath the Work Guide. This displays the approval steps. In our example, only the first step for Manager Approval will be shown until the Manager takes action. If approved, the next steps for Pricing Analyst and CEO approval will be shown.
Apex Class
public with sharing class QuoteApprovalLWCController {
@AuraEnabled
public static void submitQuoteForApproval(Id quoteId, String submitterComments) {
String flowApiName = ‘Approval_Workflow’;
Map<String, Object> inputs = new Map<String, Object>();
inputs.put(‘recordId’, quoteId);
inputs.put(‘submitter’, UserInfo.getUserId());
inputs.put(‘submissionComments’, submitterComments);
Flow.Interview myFlow = Flow.Interview.createInterview(flowApiName, inputs);
myFlow.start();
}
}
LWC HTML
<template>
<lightning-card title=”Submit for Approval” icon-name=”standard:approval”>
<div class=”slds-m-around_medium”>
<lightning-textarea
label=”Enter comments for Approver(s):”
value={submitterComments}
onchange={handleCommentChange}
></lightning-textarea>
<div class=”slds-m-top_medium slds-align_absolute-center”>
<lightning-button
label=”Submit”
variant=”brand”
onclick={handleSubmit}
class=”slds-m-right_x-small”
></lightning-button>
<lightning-button
label=”Cancel”
onclick={handleCancel}
></lightning-button>
</div>
</div>
</lightning-card>
</template>
LWC JS
import { LightningElement, api } from ‘lwc’;
import { ShowToastEvent } from ‘lightning/platformShowToastEvent’;
import { CloseActionScreenEvent } from ‘lightning/actions’;
import submitQuoteForApproval from ‘@salesforce/apex/QuoteApprovalLWCController.submitQuoteForApproval’;
export default class QuoteApproval extends LightningElement {
@api recordId;
submitterComments = ”;
handleCommentChange(event) {
this.submitterComments = event.target.value;
}
async handleSubmit() {
try {
await submitQuoteForApproval({ quoteId: this.recordId, submitterComments: this.submitterComments });
this.dispatchEvent(new ShowToastEvent({
title: ‘Success’,
message: ‘Quote submitted for approval’,
variant: ‘success’
}));
this.dispatchEvent(new CloseActionScreenEvent());
} catch (error) {
this.dispatchEvent(new ShowToastEvent({
title: ‘Error’,
message: error.body.message,
variant: ‘error’
}));
}
}
handleCancel() {
this.dispatchEvent(new CloseActionScreenEvent());
}
}
LWC XML
<?xml version=”1.0″ encoding=”UTF-8″?>
<LightningComponentBundle xmlns=”http://soap.sforce.com/2006/04/metadata”>
<apiVersion>61.0</apiVersion>
<isExposed>true</isExposed>
<masterLabel>Quote Approval</masterLabel>
<description>Component to submit a quote for approval</description>
<targets>
<target>lightning__RecordPage</target>
<target>lightning__AppPage</target>
<target>lightning__HomePage</target>
<target>lightning__RecordAction</target>
</targets>
<targetConfigs>
<targetConfig targets=”lightning__RecordAction”>
<actionType>ScreenAction</actionType>
</targetConfig>
</targetConfigs>
</LightningComponentBundle>
Testing & Visibility
After setting up your flow:
1. Add a Submit for Approval button to the Quote layout.
2. Include the Orchestration Work Guide and Approval Trace components to the Quote page for clarity.
3. Monitor approval statuses and approvers’ decisions directly from the Quote record.

