Pricing procedures are customizable, ordered stacks of pricing elements that are used to calculate the final net price of a product by using the Pricing Procedure Builder. Transform all pricing policies established by your business into pricing procedures. Pricing elements call appropriate lookup tables to perform the pricing calculations.

Mastering Salesforce Pricing with Predefined Lookup Tables
Salesforce Pricing leverages predefined lookup tables to efficiently map input values to corresponding rows in a decision matrix or table. This enables you to return relevant outputs for use within pricing procedures or elements, streamlining the decision-making process.
Understanding Lookup Tables
Lookup tables act as powerful tools that match your input values to specific rows in a decision table. Once a match is found, the associated output is returned and utilized in the designated pricing procedure or element. Salesforce Pricing allows you to either customize your lookup tables or use the existing predefined ones.
Mapping Rule Variables
When working with lookup tables, it’s important to understand how to map variables effectively:
- Input Rule Variables: These are the variables derived from the selected lookup table’s input data.
- Output Rule Variables: These are the variables representing the output data retrieved from the lookup table.
- Input Variables: These refer to data inputs provided by the pricing element.
- Output Variables: These are generated outputs from the pricing element.
Additional Variables: Custom output variables used to capture pricing changes. Note that these variables can only be added in Advanced mode (JSON) during simulation and are viewable in the waterfall view

Context Definitions
Context definitions are integral to the pricing process as they contain the necessary information for execution. These definitions include:
- Node Structure and Relationships: The hierarchy and connection of nodes.
- Attributes and Context Tags: Tags that associate data from Salesforce objects with pricing elements.
- Mapping: This updates the nodes and attributes with the appropriate input data from Salesforce, ensuring that the pricing procedure runs accurately and writes results back to the relevant context.
Create a context definition by choosing nodes, defining their relationship, adding attributes, and applying context tags.
How to Create and Manage Context Definitions in Salesforce
Setting up context definitions in Salesforce is crucial for running an efficient pricing process and organizing data relationships. Here’s a step-by-step guide to create and configure context definitions.
Creating a New Context Definition

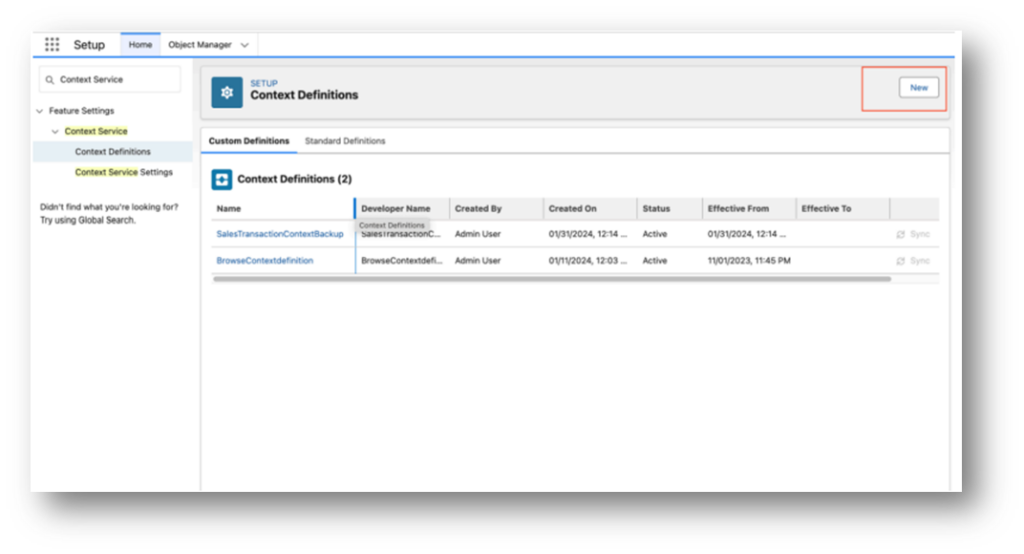
1.Navigate to Context Definitions:
From Setup, enter Context Service in the Quick Find box.
Select Context Definitions and click New.
2.Specify Context Definition Details:
– Name: Enter a name for your context definition.
– Inherited From: Choose a standard definition to extend, if applicable.
– Description: Optionally, add details about the context definition.
– Effective Date Range: Specify the date range for when the context definition will be active. If you leave Effective To – empty, the definition remains active indefinitely. If you leave Effective From empty, the current date and time are used.
3.Set Time to Live:
Define how long the data in the context instance should stay cached in the context service.
Defining the Context Structure
1.Configure Node Relationships:
– Click Next to set up a structure that defines relationships between nodes.
– Add Child Nodes: Click the Child Node icon to add child nodes.
– Add Sibling Nodes: Click the Sibling Node icon to add nodes on the same level.
– Use the More icon to:
– Mark as Transposable: Convert a node’s record to a field name.
– Delete: Remove a node. Note that deleting a parent node also deletes all associated child nodes.
2.Node Details: Name each node and define the hierarchy to determine how data is consumed and processed.
Adding Attributes to Nodes

1.Click Next and add attributes for each node.
2.Attribute Details:
– Choose the input type, data type, and specify values if working with key-value pairs.
– If you marked a node as transposable, a key-value column will be displayed.
Note: All date and time attributes are returned in UTC. The consuming application can convert this to the desired time zone.

Defining Context Tags
1.Click Next and set up context tags for querying and updating data.
2.Tag Details:
– Choose a node and enter the tag name in the Tags column, such as “Phones,” and click Done.
– Similarly, select an attribute, add a tag (e.g., “Color”), and click Done.
Note: Context tags help consuming applications efficiently query and manage data.
Saving and Activating Your Context Definition
1.Click Save to finalize the context definition.
2.Your new context definition will appear on the Context Definitions page, under the Custom Definitions tab.
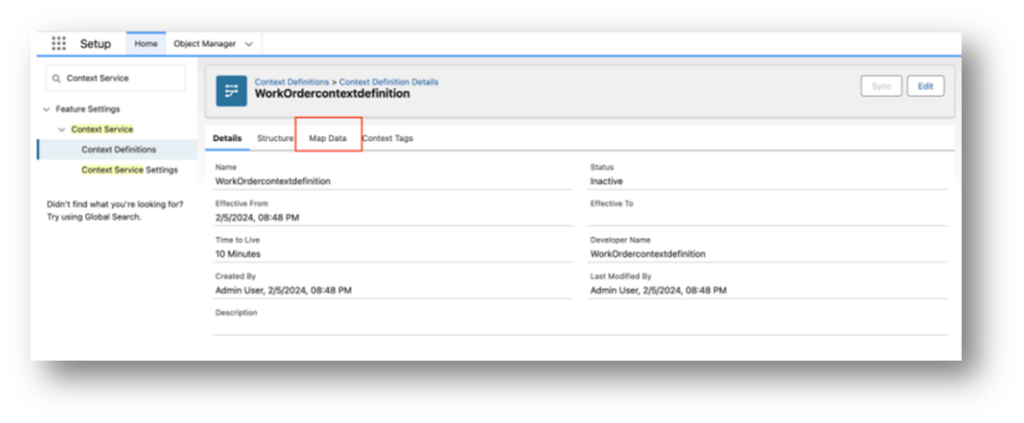
3.Click on the context definition to begin the mapping process.
4.After mapping is complete, activate your context definition to use it in your pricing processes.
Add Context Mapping
Adding Context Mappings in Salesforce: A Step-by-Step Guide

Context mapping in Salesforce is essential for connecting nodes and attributes to relevant data sources, allowing data to flow seamlessly between your context definitions and Salesforce objects. Here’s how to set up and manage context mappings effectively.
Setting Up Context Mappings

1.Locate Your Context Definition:
– Go to Setup, search for Context Service in the Quick Find box, and select Context Definitions.
-Choose the context definition you want to map, then open the Map Data tab and click Add Mapping.
2.Specify Mapping Details:
– Name your mapping and provide an optional description.
– For automatic mapping to standard objects, select Automatic Salesforce Object Mapping.
– To set this mapping as the default, check Mark as default.
– Click Next.
3.Set Mapping Intent:
– Select at least one Mapping Intent operation based on your needs:
– Association: Treat mappings as metadata to relate two different context definitions.
– Hydration: Populate a context instance with data from standard Salesforce or data model objects.
– Persistence: Save cached context data back to its data source.
– Translation: Convert data cached in one format to another.
– Click Map to proceed to the Context Mapping builder.

Mapping Nodes and Attributes
1.Choose a Data Source:
– On the Connect Objects tile, select Salesforce Objects or Context Definition Objects to view relevant data sources:
1.Salesforce Objects: Use this for standard objects and data model objects.
2.Context Definition Objects: Use this to map attributes to other context definitions.
2.Begin Mapping:
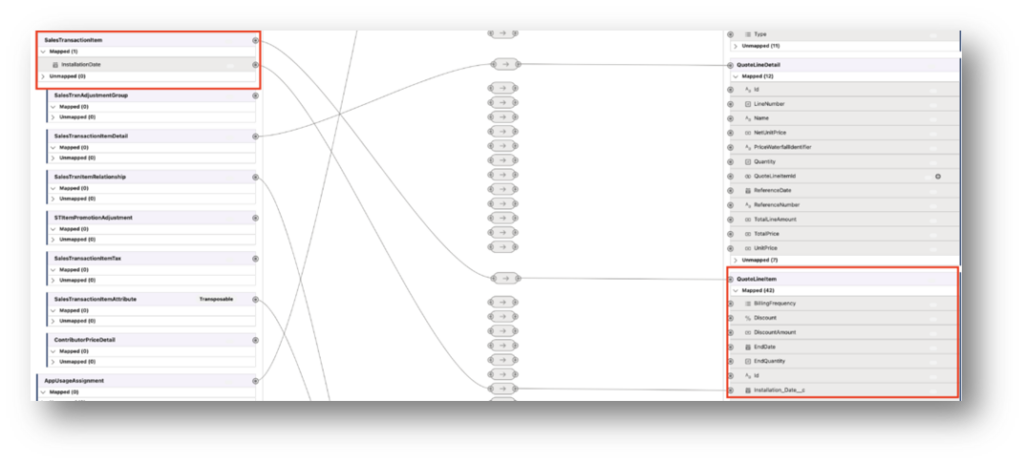
– Click the node or attribute icons in the Structure tile, then click the object fields to establish a connection.
– Repeat this process to map all nodes and attributes.
3.Handling Unmapped Fields:
– If the necessary fields are missing, check for sObjects with lookup relationships.
– Use the Mapping Add Icon to add these fields, which then appear in the Unmapped section of your object.
4.Complete and Save Mapping:
– Once all mappings are set, click Save to store your changes
Activating Context Definitions
After you’ve defined the structure, mapped nodes, and attributes, activate the context definition to enable it for your applications. Activation allows consuming applications to use the context definition for enhanced processing efficiency.
Tips for Managing Context Mappings
- Mapping Rules: You can only add mappings to inactive context definitions. Set up the complete structure and mapping first, and activate only when ready.
- Unmapping: To remove a mapping, simply click the node or attribute again to deselect it.
- Mapping Requirements:
- Ensure your context definition has at least one mapping.
- If there is only one mapping, make sure it is marked as the default.
Steps to Activate a Context Definition

1.Open Context Definitions:
– From Setup, use the Quick Find box to enter Context Service and select Context Definitions.
2.Select the Context Definition:
– Choose the context definition you wish to activate.
– Click the Arrow icon pointing down next to your context definition and select Activate.
How to Extend a Context Definition in Salesforce
Extending a standard context definition allows you to inherit predefined components like nodes, attributes, and mappings while giving you the flexibility to customize and add new elements as needed. Here’s how to extend and work with a standard context definition
Steps to Extend a Context Definition
1.Access Context Definitions: From Setup, use the Quick Find box to search for Context Service and select Context Definitions.
2.Choose a Standard Definition to Extend:
-Go to the Standard Definitions tab.
-From the action menu, select the standard context definition you want to extend.
-Click the Arrow icon pointing down and choose Extend.
3.Set Up the Extended Definition:
-On the Create Context Definition page, in the Inherited From field, select the standard context definition you wish to extend.
– Customize your extended definition by adding new components like custom nodes or attributes.
Key Points About Syncing
1.Sync Availability: The Sync option is only available for extended context definitions that need an upgrade.
2.If auto-sync fails, the Sync button will become enabled for manual updates.
Steps to Upgrade a Context Definition
1.Access Context Definitions:
– From Setup, use the Quick Find box to search for Context Service and select Context Definitions.
2.Locate Your Extended Definition:
– Go to the Custom Definitions tab.
– From the action menu, select the extended context definition you wish to upgrade.
– Click the Arrow icon pointing down and choose Sync.
3.Edit and Sync: On the Context Definition Details page, click the definition you want to edit and select Edit.
While editing, click Sync to update the definition.
Elevate Your Pricing Strategy with Salesforce Pricing Procedures
In today’s competitive landscape, having a streamlined, efficient, and customizable pricing strategy is crucial. Salesforce’s Pricing Procedure Builder empowers businesses to transform complex pricing policies into manageable, ordered stacks of pricing elements. These elements utilize lookup tables to execute pricing calculations effectively. Here’s a comprehensive guide to mastering Salesforce Pricing Procedures and making the most of its powerful features.
Context Definitions: The Backbone of Pricing Procedures
Why Context Definitions Matter Context definitions ensure your pricing procedures operate seamlessly by managing data structures, relationships, and attributes. They define how information from Salesforce objects integrates with your pricing process and ensure accurate data flow and results.
Configuring and Simulating Your Pricing Procedure

Creating Your Pricing Procedure
1.Access Pricing Procedures: From the App Launcher, select Pricing Procedures and click New.
2.Details Setup:
– Enter a name and auto-populate the API name.
– Select Pricing as the usage type and link it to a context definition.
3.Building with the Pricing Procedure Builder:
– Drag and drop pricing elements from the Pricing Elements panel.
– Assign lookup tables, define ranks, and configure profile access.
– Save the procedure and prepare for simulation.

Simulating and Activating
1.Open your procedure in the builder, add elements, and map them accordingly.
2.Simulation Modes:
–Simplified: Input values directly.
–Advanced: Use JSON for complex data simulations.
3.Analyze results in the Waterfall View, which details every pricing step. Only users with the appropriate profile permissions can access this view.
4.Once satisfied with the simulation, click Activate to finalize.
Pro Tip: For List Price or Price Adjustment Matrix elements, deactivate, save, and reactivate the procedure to access the Simulate button if necessary.
Maximizing Your Salesforce Pricing Strategy
With Salesforce Pricing Procedures, you gain a comprehensive toolkit for managing intricate pricing models efficiently. From lookup tables and context definitions to real-time simulations and API integrations, your business can tailor its pricing approach to any industry standard. Mastering these features allows you to stay ahead in pricing innovation and deliver unmatched value to your clients.

