This blog provides a comprehensive guide to setting up and managing Salesforce’s Fulfillment Workspace, focusing on the creation and configuration of Fulfillment Step Groups, Step Scenarios, and Product Fulfillment Rules. It covers essential setup procedures, including the organization of tasks within swimlanes, mapping attributes and fields for product fulfillment, and handling fulfillment step triggers. Key considerations for customizing workflows, managing bundled products, and ensuring the accurate generation of fulfillment line items are also discussed, offering practical tips and troubleshooting advice for a seamless implementation.
Clarifying Salesforce Documentation
Salesforce’s official documentation often leaves critical details ambiguous, requiring additional setup steps to execute their instructions effectively. Here’s a structured guide to streamline your Fulfillment setup process.
Order of Record Creation
Understanding the sequence of record creation is essential. Several steps involve prerequisites that should be addressed beforehand. For instance:
- Email Notifications: If a Fulfillment Step includes sending an email notification, create a Flow in advance to reference it within the Fulfillment Step record.
- External Callouts: For steps involving external systems, set up an Integration Definition beforehand.
- OmniScripts: Ensure your step refers to a previously defined OmniScript, if applicable.
Key components include:
1.Product Fulfillment Rule Library
2.Product Fulfillment Decomposition Rule
– Define the bundle parent as a Source Product and its component as a Target Product.
– Optional: Add an “Execute On” Rule.
3.Fulfillment Workspace
4.Fulfillment Step Group (Fulfillment Step Definition Group)
5.Fulfillment Step Group Scenario (Required for Step Groups to be visible)
6.Fulfillment Step Definition
-Optional: Include an “Execute On” Rule.
7.Fulfillment Step
– Assignable to a User or a Queue.
Updating the Order Page Layout
To access Fulfillment Lines, update your Order page layout:
- Navigate to an Order record.
- Click the gear icon and select Edit Page.
- Add a new tab named Fulfillment Lines.
- Drag the Decomposition Viewer component to this tab.
- Save your changes.
Additional Fields Required:
- Add the Fulfillment Plan and Orchestration Submission Status fields to the Order page layout for the system to function as intended.
Dynamic Revenue Orchestration (DRO) with Bundles
Take, for example, a Laptop Pro Bundle, which includes:
- Bundled Products: Laptop and Mouse (included in the bundle price).
- Optional Products: Keyboard, Bag, Antivirus Protection, Warranty (adds to the bundle price).
Setting Up Product Fulfillment Decomposition Rules:
For fulfillment, each bundle product (optional or otherwise) requires a decomposition rule:
- Source Product: Laptop Pro Bundle → Target Product: Keyboard
- Source Product: Laptop Pro Bundle → Target Product: Bag
Fulfillment steps such as Assembly, Packaging, and Shipment must be defined for each product.
Key Insight:
- Only selected products from the bundle package, appearing as Order Lines, generate Fulfillment Lines.
- Caveat: Child products included in the bundle price (e.g., Laptop, Mouse) do not generate separate Fulfillment Lines. Instead, the parent product generates a Fulfillment Line, necessitating clear communication with the fulfillment team about included components.
Rule Library Creation
Start by creating a Product Fulfillment Rule Library with the following:
- Default Context: RLM_SalesTransactionContext.
- Usage Type: Dynamic Revenue Orchestrator (DRO).
Without a DRO Usage Type, “Execute On” Rules cannot be created on your Decomposition Rules.
Managing Context Definitions in Rule Libraries
A common misconception is that updating the Context Definition for a Rule Library is impossible after setup. Here’s how to address this:
1.Select the appropriate Context Definition when setting up your Rule Library.
– Once saved, the Rule Library’s Context Definition becomes immutable.
2.If a new Context Definition is required, clone the Rule Library into a new version.
3.During the cloning process, assign the new Context Definition.
4.Repeat this process for each new sales Context Definition to maintain compatibility across Rule Library versions.
“Execute On” Rules
An Execute On Rule defines how a Source Product decomposes into its components (Destination Products). This critical configuration ensures the fulfillment process aligns with your decomposition structure and triggers correctly.

Advanced Configuration for Product Fulfillment Rules
Defining “Execute On” Rules
An Execute On Rule allows you to specify conditions under which a Product Fulfillment Rule applies. For example:
- A rule can trigger only when Quantity ≥ 1.
- Multiple conditions can be combined to create complex execution logic.
Key Note:
- If no Execute On Rule is defined, the Product Fulfillment Rule will execute unconditionally, which may suffice for simpler use cases.
- Current Challenge: Generating Fulfillment Line Items when an Execute On Rule is applied may encounter issues, potentially due to a context tag. This is under investigation by Salesforce Support.
Fields and Attribute Mapping
Within a Product Fulfillment Rule, you can map fields from the Source Product to the Target Product. While optional, mapping becomes essential in certain scenarios:
For Bundles with Component Attributes:
– If component products in a bundle have Attributes, these must be mapped within the Product Fulfillment Rule to ensure the Attributes appear on the Fulfillment Line Item record.
Example Setup Org:
1.Bundle: Laptop Pro Bundle
2.Component Products: Include Attributes assigned to the “Computers” Product Category.
Steps for Attribute Mapping:
1.Update the Parent Product:
– Edit the “Based On” field of the parent product (e.g., Laptop Pro Bundle) to reference the appropriate Product Category (e.g., “Computers”).
– This step ensures Attributes from the component products are available for mapping.
2.Create a New Product Classification (if needed):
– For bundles with multiple component products having different Attributes, create a comprehensive Product Classification containing all relevant Attributes.
-Add this classification to the parent product’s Based On lookup field.
Pro Tip:
If Attributes do not appear in the Fields & Attribute Mapping tab, ensure they are associated with the parent bundle product.
Configuration Implications
Mapping Attributes to the parent product introduces several behaviors:
- When adding the bundle to a Quote, a gear icon appears on the parent product for configuration.
- Configuring the parent product itself has no impact; only configurations applied to component products are carried forward.
- Required Attributes:
- If an Attribute is marked as required, assign a default value to avoid manual intervention when configuring the parent product.
Mapping Process:
On the Fields & Attribute Mapping tab, map Attributes by connecting the left-side Source Attribute Name to the right-side Target Attribute Name, ensuring proper alignment for fulfillment.
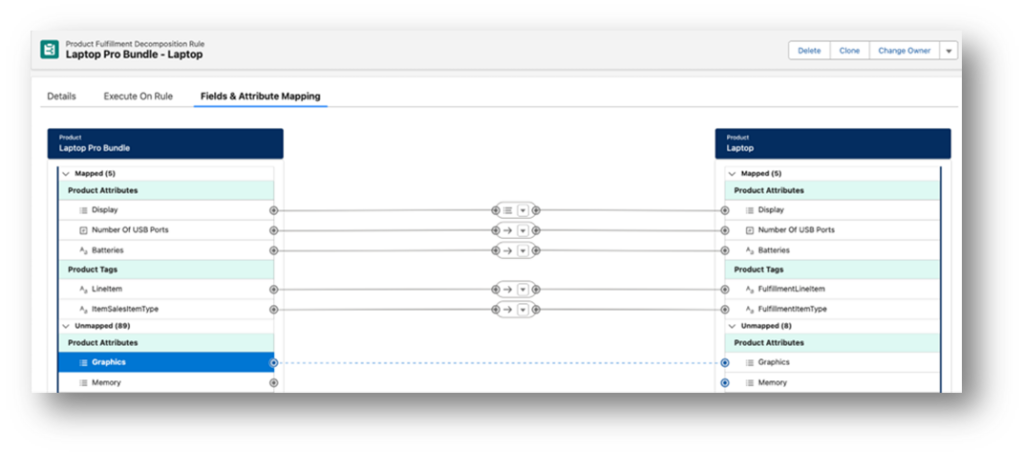
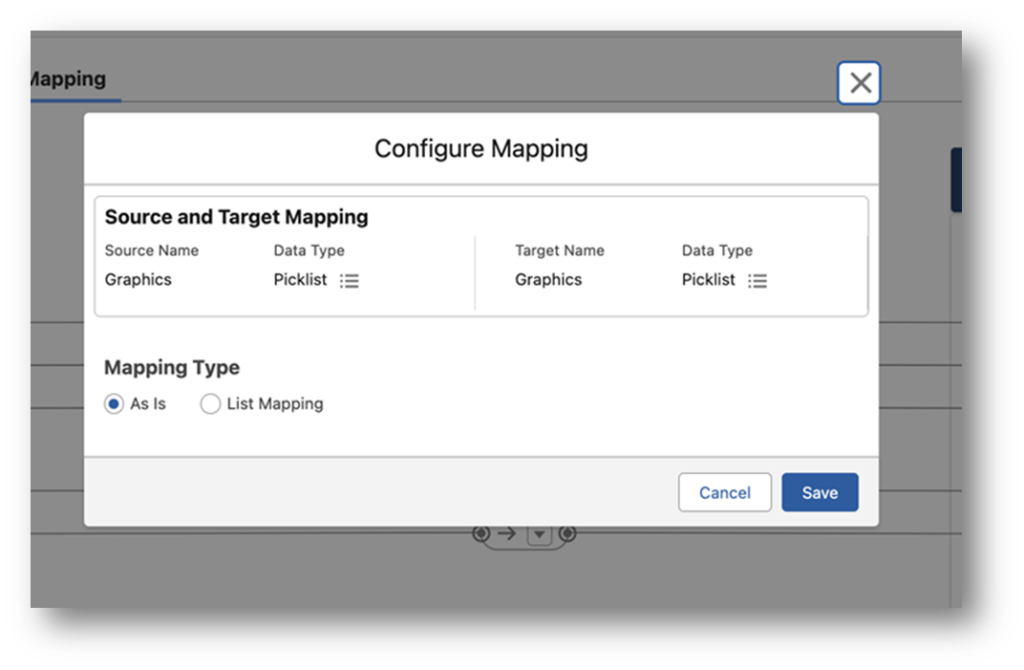
When I click the Graphics attribute on the right side, I get a popup screen:
Mapping Attributes in Product Fulfillment Rules
Mapping Types
When mapping attributes between the Source Product and the Target Product, select the appropriate mapping type based on the attribute field type:
- “As Is” Mapping:
Use this for straightforward field types such as Text, Number, or Date. The values from the Source Product are directly transferred to the Target Product without modification. - “List Mapping”:
Use this for Attribute Picklists, where the values need to be aligned between the Source and Target Products.
Example: Picklist Mapping
If your attribute is a picklist, such as Graphics, use the List Mapping type. Upon selecting this option, a popup screen appears, allowing you to map the picklist values explicitly.
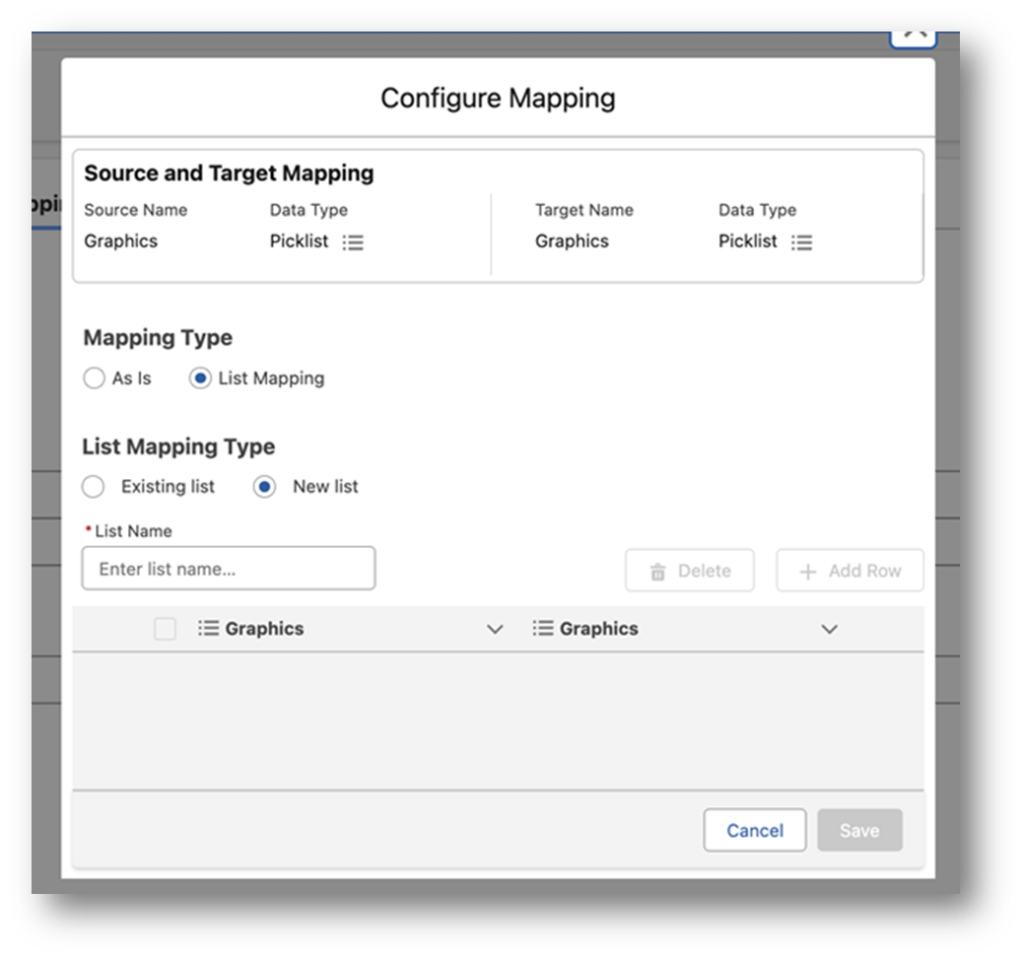
Clarifying the “List Mapping” Process for Picklists
Mapping picklist attributes using List Mapping can be unintuitive due to Salesforce’s current configuration behavior. Here’s a breakdown to demystify the process:
Common Misconception
When you encounter the List Name lookup field, you might assume:
- You can select “Existing List” and directly reference an Attribute Picklist (e.g., Graphics) from the object.
- Simply entering the picklist name in the List Name field will connect to your pre-existing Attribute List.
Reality:
- The List Name lookup does not point to the Attribute Picklist object.
- Even if you have a pre-defined Attribute Picklist (e.g., Graphics), it is not automatically available for selection in this step.
Correct Steps for “List Mapping”
1. Select “New List”:
– Choose the New List option instead of Existing List.
– This action allows you to define a custom mapping for the picklist values.
2. Enter a List Name:
– Provide a descriptive name for your custom list, such as Graphics Mapping List.
– The +Add Row button becomes active once the name is entered.
3. Map Picklist Values:
– Use the +Add Row button to manually add rows for mapping.
*For each row, specify:
– The Source Value (value from the Source Product’s picklist).
– The Target Value (corresponding value for the Target Product’s picklist).
4. Save and Review:
Ensure all Source and Target values are mapped correctly.
Save your changes to complete the mapping setup.
Key Insight
While the process may seem counterintuitive, creating a custom list under New List ensures precise mapping control. This approach avoids dependency on predefined objects and offers flexibility for more granular configurations.

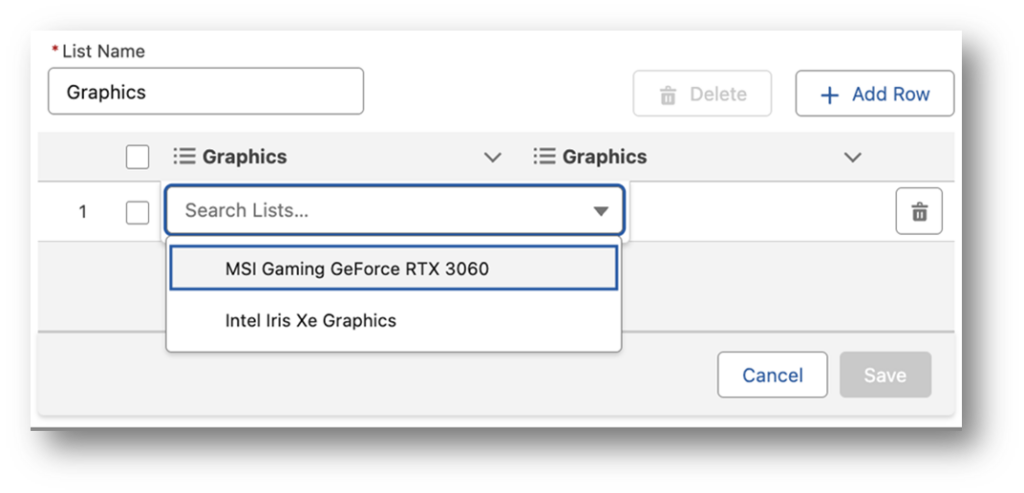
On the first row, I can click into the field in the left column and see the available values from my Attribute Picklist:
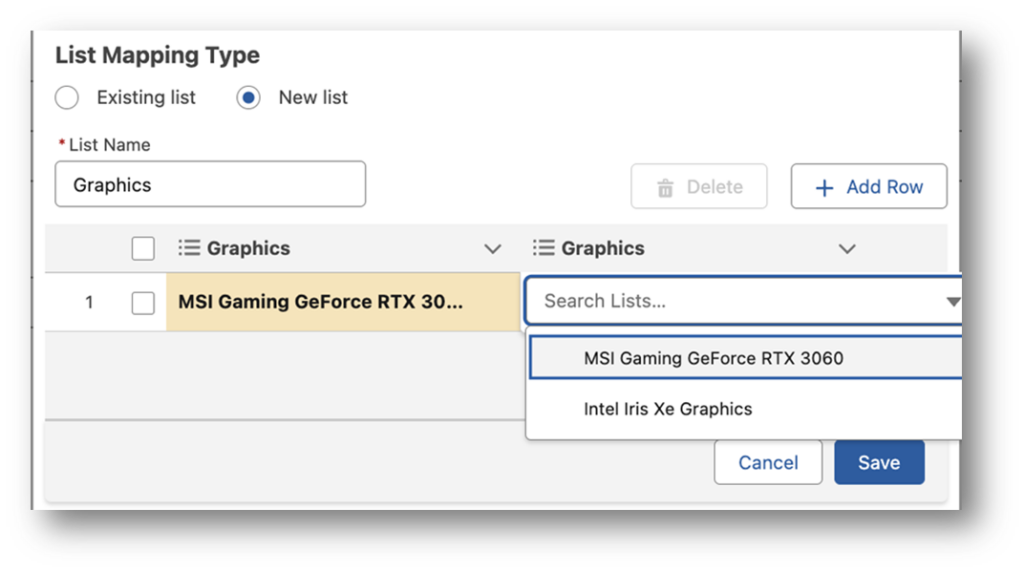
The same thing happens when I click in the field on the right column:
Continue in this way until you’ve added as many rows as are available in your picklist, and until you’ve added all the new lists you need for your Attributes.
Once you’ve created these lists, you’ll be able to search for them using the Existing List radio button when you set up other products that have the same Attribute Picklists.
One thing I like is that if you’ve excluded an Attribute Picklist value from the list that applies to this product, the full list of picklist values appears in the left column, but the list with the excluded value appears in the right column.
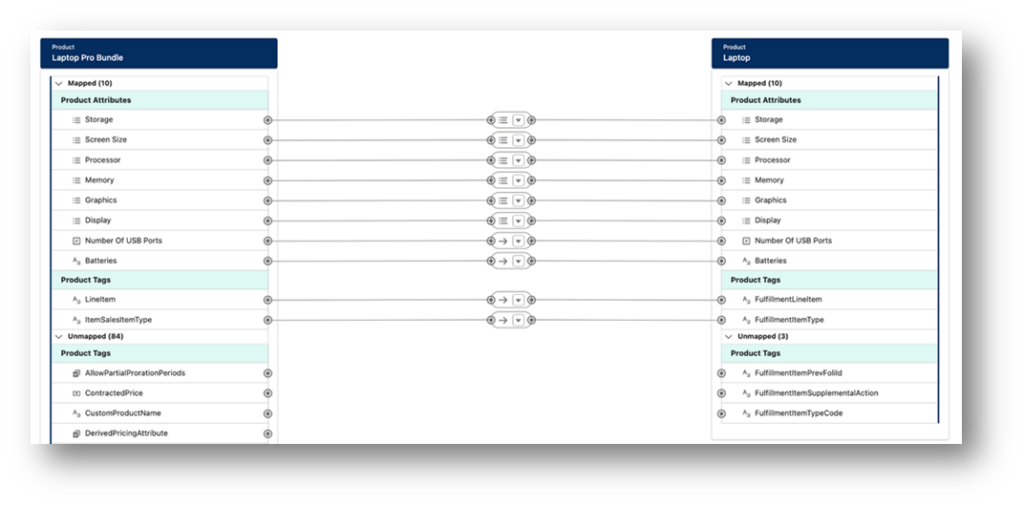
When done mapping, my Product Fulfillment Rule’s Fields & Attributes Mapping tab looks like this:
The Fulfillment Workspace Overview
The Fulfillment Workspace in Salesforce is a structured tool designed to manage and visualize the order fulfillment process. It evolves dynamically based on the records and definitions you create within the workspace, resulting in a Visio-style flow that uses swimlanes and linked steps to represent the process visually.
1. Fulfillment Step Groups
– These are responsible for creating the swimlanes in the workspace. Each group defines a set of steps relevant to a specific phase or category of fulfillment.
2. Fulfillment Steps
-Individual tasks or actions that must be completed during the fulfillment process. These appear as linked steps inside the swimlanes.
3. Fulfillment Step Scenarios
– Define the specific circumstances under which a step is executed. Scenarios include:
*Add: When a new product or service is added.
*Amend: Modifications to an existing order.
*Renew: Continuation of an existing subscription or contract.
*Cancel: Termination of an order or subscription.
The combination of these elements ensures a comprehensive, automated, and visually organized fulfillment process that aligns with your business requirements.
Fulfillment Setup
Setting up the Fulfillment Workspace in Salesforce requires attention to specific prerequisites and processes that the official documentation may not fully clarify. Below is a guide to ensure a seamless configuration.
Key Prerequisites and Considerations
- Order of Record Creation:
Certain dependencies must be addressed before you can complete the setup:- Flows: If a Fulfillment Step involves actions like sending email notifications, create the corresponding Flow beforehand to reference it in the step definition.
- Integration Definitions: For callouts to external systems, define the integration details prior to configuring the step.
- Omniscripts: Steps that rely on Omniscripts must reference scripts you’ve previously created.
Components of Fulfillment Setup
1. Product Fulfillment Rule Library
– Acts as the foundation for decomposition and orchestration rules.
2. Product Fulfillment Decomposition Rule
– Defines relationships between products in a bundle:
*Source Product: The parent or bundle product.
*Target Product: A component product that the bundle decomposes into.
3. Execute On Rule (Optional)
– Specifies conditions under which a decomposition rule applies (e.g., when quantity exceeds a threshold).
Building the Fulfillment Workspace
- Fulfillment Step Group (aka Fulfillment Step Definition Group)
– Represents a swimlane in the workspace. - Fulfillment Step Group Scenario
*Required for visibility of the Step Group in the workspace. Scenarios include:
– Add
– Amend
– Renew
– Cancel - Fulfillment Step Definition
Specifies the action or process to be performed. - Fulfillment Step Assignment
Assign the Fulfillment Step to a User or a Queue to ensure accountability. - Execute On Rule (Optional)
As with decomposition rules, steps can have optional execution conditions.
Order Page Layout Update
To enable visibility and proper functionality of Fulfillment Lines in your Order records, follow these steps:
1. Edit the Order Page Layout:
– Open the Order record page.
– Click on the gear icon (⚙️) in the upper-right corner.
– Select Edit Page.
2.Add Fulfillment Lines Tab:
– In the page layout editor, add a new Tab and name it Fulfillment Lines.
– From the left-hand components list, drag the Decomposition Viewer component into the newly created Fulfillment Lines tab.
– Save your changes.
3. Add Required Fields:
– For the system to work properly, ensure the following fields are included on the Order page layout:
*Fulfillment Plan
*Orchestration Submission Status
This will allow the Fulfillment Lines to be displayed and tracked on your Orders.
How DRO Works with Bundles
When working with bundles, the Dynamic Revenue Orchestrator (DRO) helps manage the decomposition of bundled products into their constituent parts. Here’s how it works in your example:
Laptop Pro Bundle Example:
1. Base Bundle: Laptop Pro Bundle
Included Products: Laptop, Mouse (these are included in the bundle price)
Optional Products: Keyboard, Bag, Antivirus Protection, Warranty (selecting these increases the bundle price)
To set up fulfillment for this bundle:
1.Create Product Fulfillment Decomposition Rules for each item:
– Source Product: Laptop Pro Bundle | Target Product: Keyboard
– Source Product: Laptop Pro Bundle | Target Product: Bag
Repeat this process for each item in the bundle, whether it’s an included or optional product.
2. Fulfillment Steps:
– For each product (or Target Product), set up fulfillment steps such as Assembly, Packaging, and Shipment.
3. Fulfillment Lines:
– Only the products you select in the bundle (the ones added as Order Lines) will generate Fulfillment Lines.
– However, if a child product (like the Laptop or Mouse) is included in the bundle’s price and does not need to be selected separately, it won’t create a Fulfillment Line on its own.
– Instead, you will get a Fulfillment Line for the parent product (the Laptop Pro Bundle), and your fulfillment team will need to manually know what is included, such as the Laptop and Mouse in this example.
Creating a Rule Library
Before you begin setting up your fulfillment system, ensure that you have a Rule Library in place. This is crucial to define your Product Fulfillment Rules.
1. Create the Rule Library:
○ Name the Rule Library: Call it Product Fulfillment Rule Library.
○ Usage Type: Select Dynamic Revenue Orchestrator (DRO) as the Usage Type.
○ Context: Choose your default RLM_SalesTransactionContext.
Note: If your Rule Library does not have the DRO Usage Type, you won’t be able to create “Execute On” rules for your Decomposition Rules, which are necessary for defining when a fulfillment step should be triggered.
Managing Context Definitions and Rule Library Versions
When working with Context Definitions and Rule Libraries, keep the following points in mind to avoid potential issues:
1. Context Definition and Rule Library:
○ When setting up your Rule Library, you select your current sales transaction Context Definition.
○ Once the Rule Library is saved, you cannot change the Context Definition. If you need a new Context Definition later, the Rule Library won’t be updated.
2. Handling New Context Definitions:
○ You can create a new version of the Rule Library to assign a different Context Definition.
○ Important: The Context Definition can only be selected during the initial creation of a new Rule Library version. It cannot be changed afterward.
3. Action Required: Whenever you create a new Context Definition for sales, remember to clone a new version of your Rule Library and select the new Context Definition at that time.
Summary:
● Create a Rule Library with DRO as the Usage Type and the default RLM_SalesTransactionContext.
● Context Definition is locked once a Rule Library is created, but you can assign a new one when cloning a Rule Library Version.
● For any new Context Definitions, you need to create a new Rule Library Version to ensure the system works as expected.
This process helps you maintain flexibility while ensuring that the correct Context Definitions are tied to each version of your rules.
“Execute On” Rules in Product Fulfillment
When setting up a Product Fulfillment Rule, you can define conditions under which the rule should be executed using an “Execute On” Rule. This allows for more complex control over when the fulfillment process is triggered, depending on certain conditions.
How “Execute On” Rules Work:
- Product Fulfillment Rule:
A Source Product is decomposed into one or more Destination Products.
The Execute On Rule is used to specify when the rule should apply, such as:
Quantity >= 1 (a common condition).
You can define multiple conditions to make the rule more complex, ensuring that fulfillment only occurs under specific circumstances. - Examples of “Execute On” Conditions:
Quantity >= 1: Ensures the rule fires only when there is at least one unit of the product.
Order Amount > $500: Triggers the rule only when the order total exceeds a certain value.
Product Category = “Laptop”: Fires only when a specific product category is involved in the fulfillment. - Default Behavior (No Execute On Rule):
If no Execute On Rule is set, the Product Fulfillment Rule will fire every time, regardless of conditions. This can be fine if you want the fulfillment to always trigger, but adding an Execute On Rule makes the process more efficient by only firing when necessary.
Troubleshooting “Execute On” Rule Issues:
Currently, you may encounter issues with Fulfillment Line Items not being generated when an Execute On Rule is included. As noted, this could be related to context tags, and Salesforce Support is looking into this issue.
Potential Issues to Investigate:
- Context Tags: Ensure that the context tags used in the Execute On Rule are correctly mapped and active.
- Rule Conditions: Double-check that the conditions specified in the Execute On Rule are properly set up and match the data in your system.
- Record Data: Verify that the records (such as Order or Product) involved in the fulfillment process meet the criteria set by the Execute On Rule.
Next Steps:
- Work with Salesforce Support to resolve any context tag issues affecting the generation of Fulfillment Line Items when an Execute On Rule is included.
- Review your Product Fulfillment Rules and ensure the Execute On Rules are set up with the appropriate conditions for your fulfillment process..
Fields and Attribute Mapping in Product Fulfillment Rules
Within each Product Fulfillment Rule, you have the option to map fields from the Source Product to the Target Product. This mapping is not mandatory but becomes necessary in certain situations, especially when dealing with Attributes of component products in a bundle. Here’s how the mapping works:
Mapping Attributes Between Source and Target Products
1.Bundle Products and Attributes:
– If you have a bundle product, and the component products have attributes (e.g., color, size, configuration), you must map these attributes to the Fulfillment Line Item.
– For this to happen, you need to ensure that the parent bundle product has the relevant attributes.
Example:
– If you have a Laptop Pro Bundle that includes a Laptop component with attributes, you must add those attributes to the Laptop Pro Bundle.
2.Making Attributes Available for Mapping:
To include component attributes in the Product Fulfillment Rule, you need to:
– Edit the Laptop Pro Bundle so its “Based On” field is set to the appropriate Product Category (e.g., “Computers”).
This ensures the attributes from the component products are inherited by the parent product, making them available for mapping.
3.Handling Multiple Component Products:
– If multiple component products have their own attributes, you will need to create a new Product Classification to hold all the relevant attributes.
– After creating this classification, add it to the Based On lookup field in the parent bundle product.
Tip: If you don’t see attributes on the left side of the Fields & Attribute Mapping tab in your Product Fulfillment Rule, make sure you have properly added attributes to the parent bundle product.
Configuration of Attributes for Bundle Products
- When you add the bundle to a Quote, you’ll see a gear icon on the parent product, which allows you to configure it.
- Keep in mind:
- The configuration of the parent product itself doesn’t carry over to the fulfillment process. Only the configuration of component products is relevant.
- If any attributes are marked as required, you should give them default values. Otherwise, you will need to select values for them during the configuration.
Mapping Attributes: Steps and Considerations
1.Attribute Mapping:
– In the Fields & Attribute Mapping tab of the Product Fulfillment Rule, you connect attributes from the Source Product to the Target Product.
– For text, number, or date fields, you use the “As Is” mapping type. For picklists, you select “List Mapping”.
2.Working with Picklists:
– When you map an attribute that is a picklist, you will see a pop-up screen with two columns:
Left column: Available values from your Attribute Picklist.
Right column: Values that you have already selected.
3.Key Step:
– Instead of selecting an existing list directly from the picklist object, you need to create a new list and add values manually by selecting the “+ Add Row” button.
4.Adding Rows:
– For each picklist value you want to add to the mapping, click the corresponding fields in the left and right columns and select the values.
5.Final Review:
-After completing the mappings, the Fields & Attribute Mapping tab of your Product Fulfillment Rule should show the mapped attributes and their respective values for both source and target products.
Troubleshooting Attribute Mapping
- If you can’t see certain attributes:
- Ensure that the attributes have been correctly added to the parent bundle product and that the parent product’s Based On field references the appropriate classification.
- Picklist mapping confusion:
- It can be tricky to map picklists because the Existing List radio button does not directly reference the picklist object. You need to manually create a new list and populate it with values.

