

INTRODUCTION
One of the most valuable skills in Salesforce is knowing where to look before trying to fix a problem.
When something unexpected happens in an org, the immediate reaction is often to jump into Flows, Apex classes, or Debug Logs. But two of the most powerful troubleshooting tools are already built directly into Salesforce — no code required, no setup complexity, no external tools needed.
These two tools are:
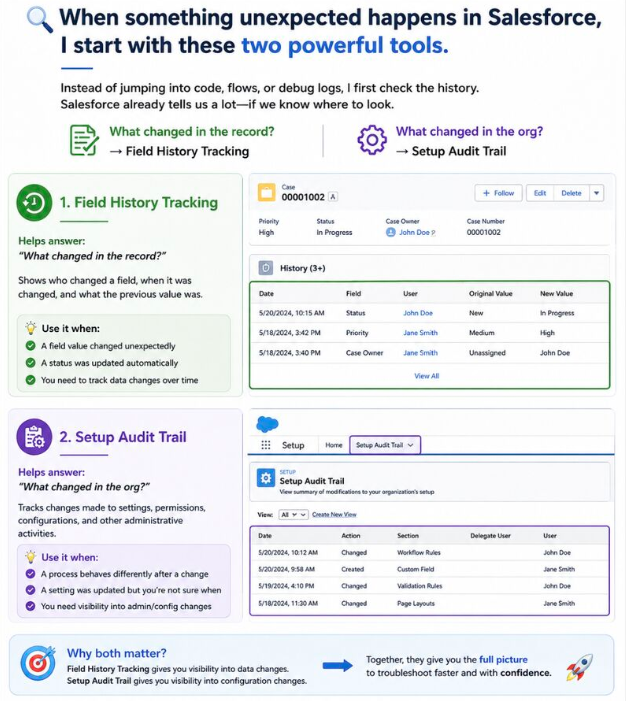
- Field History Tracking — helps answer “What changed in the record?”
- Setup Audit Trail — helps answer “What changed in the org?”
Together, they provide a complete picture of both record-level and configuration-level changes. Before writing a single line of debug code, these tools can save hours of investigation — if you know they exist and know how to use them.
THE CHALLENGE
Why Troubleshooting in Salesforce Is Often Harder Than It Should Be
Salesforce is a powerful platform. But that power comes with complexity. When something breaks or behaves unexpectedly, identifying the root cause can feel like searching for a needle in a haystack.
Common Troubleshooting Scenarios:
- A field value changed to something unexpected — and nobody knows why
- A process that worked perfectly yesterday is behaving differently today
- A record was updated automatically and no one can explain what triggered it
- A configuration change was made in the org and the impact is unclear
- A deployment happened and something stopped working shortly after
The Instinctive (But Inefficient) Reaction:
Most developers and admins immediately reach for:
- Flow debug logs
- Apex execution logs
- Process Builder trace flags
- Developer Console queries
These are valid tools — but they look forward, not backward. They tell you what is happening now, not what happened before. The two tools covered in this blog look backward, and that is exactly what most troubleshooting requires.
TOOL ONE — FIELD HISTORY TRACKING
Field History Tracking — Visibility Into Record-Level Changes
Helps Answer: “What changed in the record?”
Field History Tracking is a native Salesforce feature that records changes to field values on any standard or custom object. When enabled, it captures who changed a field, when it was changed, and what the previous value was — giving you a clear, timestamped audit trail at the record level.
What It Tracks:
- The field that was changed
- The user who made the change
- The date and time of the change
- The original value before the change
- The new value after the change
Use It When:
- A field value changed unexpectedly and you need to find out who did it
- A status was updated automatically and you cannot identify the trigger
- You need to track data changes over time for compliance or investigation
- A record does not look the way it should and you need to trace the history
How to Access It:
Field History Tracking is visible directly on the record page under the History related list. Every tracked field change appears as a row with full context — no SOQL queries or log files required.
Example Scenario:
Imagine a Case record where the Priority field suddenly changed from Medium to High overnight. Without Field History Tracking, you might spend an hour checking automation, Flows, and Apex triggers. With Field History Tracking enabled, you open the record, look at the History related list, and immediately see:
- Date: 5/20/2024, 10:15 AM
- Field: Status
- User: John Doe
- Original Value: New
- New Value: In Progress
Root cause identified in seconds, not hours.
Important Consideration:
Field History Tracking must be enabled per object and per field before changes are recorded. It does not capture historical data retroactively. Turn it on for important fields proactively — before issues occur.
TOOL TWO — SETUP AUDIT TRAIL
Setup Audit Trail — Visibility Into Org-Level Configuration Changes
Helps Answer: “What changed in the org?”
While Field History Tracking covers record-level changes, Setup Audit Trail operates at an entirely different layer. It tracks changes made to the Salesforce org’s setup and configuration — permissions, workflows, validation rules, page layouts, custom fields, and hundreds of other administrative settings.
What It Tracks:
- Changes to Workflow Rules and Process Builder flows
- Creation or modification of Custom Fields
- Updates to Validation Rules
- Page Layout modifications
- Permission Set and Profile changes
- Changes made by Delegate Administrators
- Any action performed inside the Setup menu
Use It When:
- A process started behaving differently after a deployment or config change
- A setting was updated but you are not sure who changed it or when
- You need visibility into admin and configuration-level activity
- Something changed in the org and you need a chronological record of what happened
How to Access It:
Navigate to Setup → Setup Audit Trail. The log displays the last 180 days of setup changes, including the date, action taken, section affected, and the user who made the change. You can also download a full export for deeper investigation.
Example Scenario:
A validation rule suddenly starts blocking record saves that worked fine last week. Instead of reverse-engineering the rule logic, you open Setup Audit Trail and check recent changes. You immediately see:
- Date: 5/19/2024, 4:10 PM
- Action: Changed
- Section: Validation Rules
- User: John Doe
Now you know exactly when the rule changed, who changed it, and where to look. Investigation time: two minutes instead of two hours.
WHY BOTH TOOLS MATTER TOGETHER
The Full Picture — Record Changes and Org Changes in One View
Each tool answers a different question. Used together, they cover the two most common categories of unexpected behavior in Salesforce:
Field History Tracking gives you:
- Visibility into data changes at the record level
- A clear who, when, and what for every tracked field
- Context for user-driven and automation-driven record updates
Setup Audit Trail gives you:
- Visibility into configuration changes at the org level
- A chronological log of admin and developer activity
- Evidence of deployment-related or permission-related changes
Together they give you the full picture to troubleshoot faster and with confidence.
Before spending time in debug logs or writing diagnostic Apex, checking these two tools first takes less than five minutes and frequently reveals the root cause immediately.
REAL-WORLD IMPACT
How These Tools Change the Troubleshooting Experience
Scenario 1: Unexpected Field Value Change
Traditional Approach (Before):
- Review all Flows referencing the field
- Check Process Builder and Workflow Rules
- Enable debug logging and reproduce the issue
- Review Apex triggers for the object
- Time to resolution: 2 to 4 hours
With Field History Tracking (After):
- Open the record and check the History related list
- Identify the user, time, and previous value immediately
- Time to resolution: 2 to 5 minutes
Scenario 2: Process Behaving Differently After Deployment
Traditional Approach (Before):
- Review recent deployment components
- Check changed Flows and Apex classes
- Compare sandbox and production behavior
- Escalate to the deployment team for review
- Time to resolution: Half a day or more
With Setup Audit Trail (After):
- Open Setup Audit Trail and filter by recent date
- Identify the configuration change that caused the behavior
- Time to resolution: 5 to 10 minutes
Team Impact:
- Developers: Spend less time on manual investigation
- Admins: Can identify configuration issues independently
- Business: Faster resolution of production incidents
- Support: Fewer escalations due to clear audit evidence
KEY LEARNING
What These Tools Teach Us About Troubleshooting
Learning 1: Look Backward Before Moving Forward The instinct to start debugging immediately is understandable but often inefficient. Understanding what changed before the problem appeared is almost always faster than trying to reproduce and trace the problem from scratch.
Learning 2: Visibility Is a Design Choice Field History Tracking does not enable itself. The fields you track today are the fields you can investigate tomorrow. Treating visibility as a proactive design decision — not a reactive afterthought — dramatically improves your troubleshooting capability.
Learning 3: Configuration Changes Are Often the Hidden Culprit Many production incidents are not caused by code bugs. They are caused by configuration changes — a modified validation rule, an updated permission set, a changed workflow condition. Setup Audit Trail surfaces these instantly.
Learning 4: The Platform Gives You More Than You Think Salesforce already provides powerful diagnostic tools out of the box. Before reaching for external logging frameworks or complex debugging setups, explore what the platform already offers. Most of the time, the answer is already there.
BEST PRACTICES
Getting the Most Out of Field History Tracking and Setup Audit Trail
Best Practice 1: Enable Field History Tracking Proactively Do not wait for an incident to enable Field History Tracking. Identify the most important fields on your key objects — Status, Owner, Amount, Priority — and enable tracking before issues arise. Retroactive data is not available.
Best Practice 2: Review Setup Audit Trail After Every Deployment Make Setup Audit Trail review a standard part of your post-deployment checklist. A quick scan after every release confirms what changed and provides a baseline for future troubleshooting.
Best Practice 3: Know the Limits Field History Tracking retains data for 18 months and is limited to 20 fields per object. Setup Audit Trail retains 180 days of history. Plan around these limits and export data regularly if longer retention is required.
Best Practice 4: Use Both Before Opening a Debug Log Establish a troubleshooting order of operations. Field History Tracking and Setup Audit Trail first. Debug logs and code investigation second. This simple habit will save significant time across your team.
Best Practice 5: Train Your Admins These tools are as valuable for administrators as they are for developers. Ensuring your admin team knows how to access and read both tools empowers faster first-response investigation without always requiring developer involvement.
KEY INSIGHT
Good Troubleshooting Starts With Visibility
The best Salesforce professionals do not always fix problems faster because they know more code. They fix problems faster because they know where to look first.
Field History Tracking and Setup Audit Trail are visibility tools. They do not require configuration beyond initial setup. They do not require Apex knowledge. They do not require elevated permissions beyond basic admin access.
They simply require the habit of checking them first.
Salesforce already tells us a lot — if we know where to look.
Final Thought
When something unexpected happens in Salesforce, resist the urge to immediately open Developer Console or trace debug logs. Take two minutes first. Check Field History Tracking on the affected record. Check Setup Audit Trail for recent configuration changes.
Most of the time, the answer is already there — timestamped, attributed, and waiting.
Good troubleshooting starts with visibility, and Salesforce provides more of it than most people realize. The tools exist. The habit is what separates a two-minute resolution from a two-hour investigation.