

INTRODUCTION
In Salesforce development lifecycle management, deployment is the critical bridge between development and production. Yet many admins and developers approach change sets with incomplete understanding of how they work, leading to failed deployments, missing dependencies, and production issues. The distinction between inbound and outbound change sets is fundamental to successful deployment strategy. This post demystifies these concepts, explores the deployment pipeline, and provides best practices for smooth, controlled releases.
THE DEPLOYMENT CHALLENGE
Why Deployment Is Critical and Complex
Salesforce deployment isn’t simply copying code. It’s a carefully orchestrated process that must:
Key Challenges:
- Dependency Management – Ensuring all dependencies are included and in correct order
- Test Coverage – Maintaining code coverage and passing required tests
- Data Integrity – Not corrupting existing production data
- Validation – Checking for conflicts and issues before deployment
- Rollback Capability – Having a way to undo if something goes wrong
- Zero Downtime – Deploying without interrupting user access
- Audit Trail – Maintaining records of what was deployed and when
- Stakeholder Communication – Coordinating across teams and getting approvals
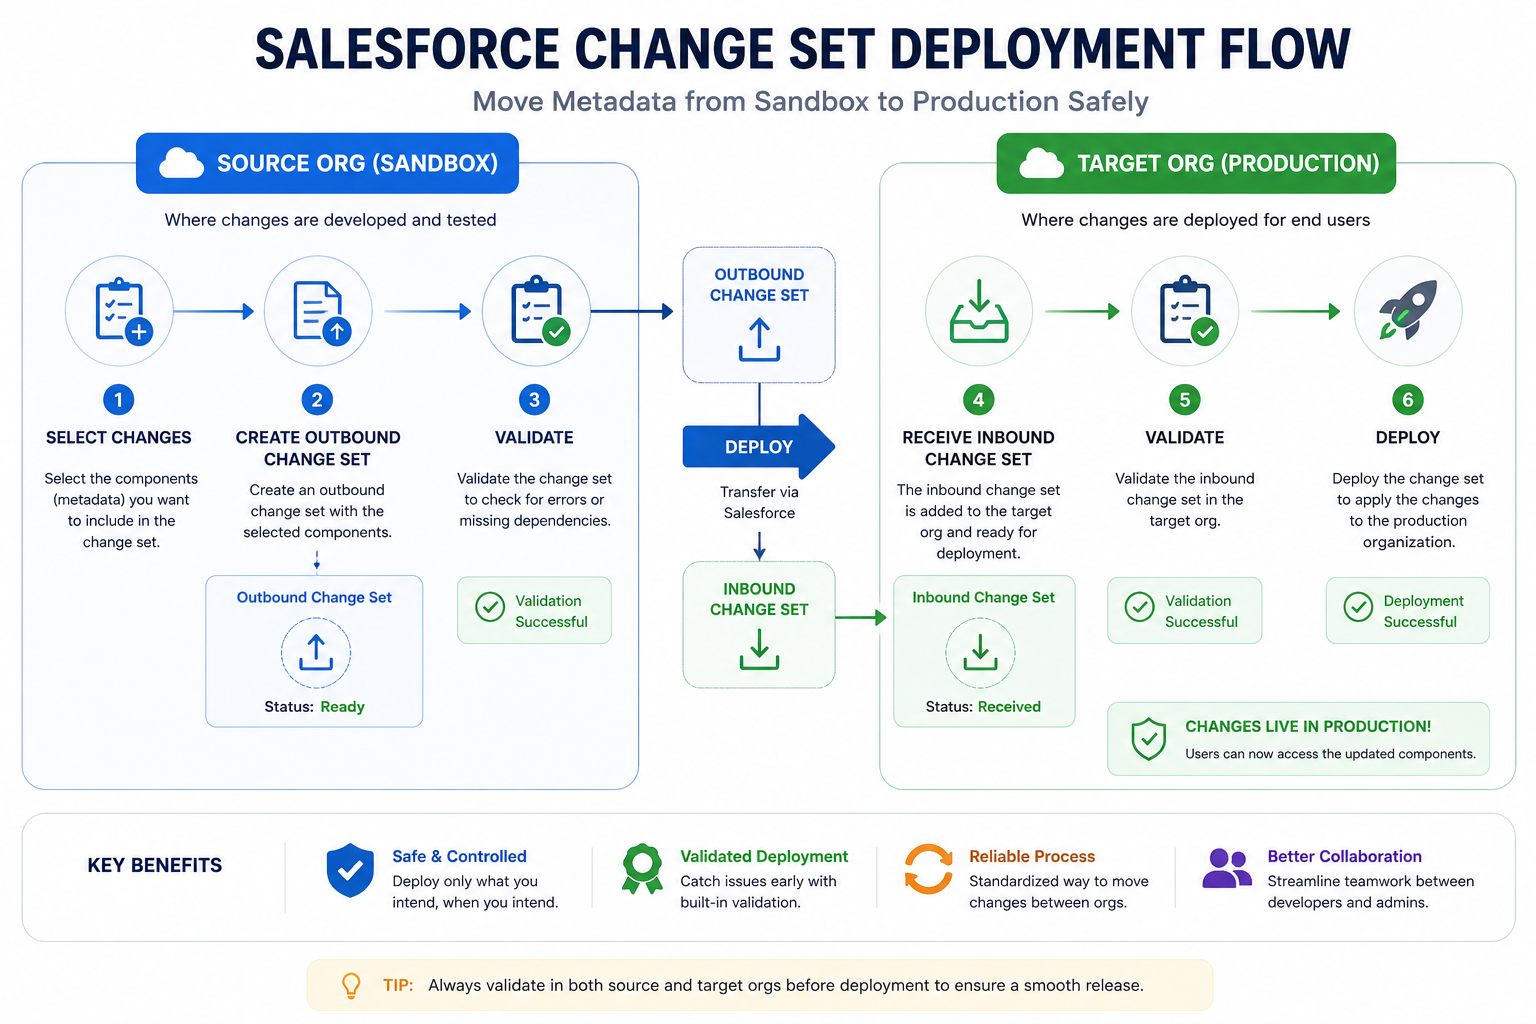
Change sets are Salesforce’s native deployment mechanism, and understanding inbound vs outbound is essential to leveraging them effectively.
OUTBOUND CHANGE SETS
Creating and Sending Changes from Source Org
An outbound change set is created in the source organization (typically a sandbox or development environment) and sent to a target organization.
What is an Outbound Change Set?
Definition:
A package of metadata components and their dependencies created in a source org, ready to be sent to a target org for validation and deployment.
Characteristics:
- Created in source org only
- Represents changes made in development environment
- Contains selected components (Apex, Flows, Objects, Fields, etc.)
- Ready to upload and deploy
- Acts as a deployment package
Creating an Outbound Change Set
Step 1: Access Change Sets
Setup → Deploy → Outbound Change Sets
Step 2: Create New Change Set
Button: Create New
Details to configure:
– Name: Descriptive, following naming convention
– Description: Document what’s included and why
– Optional: API Version for backward compatibility
Step 3: Add Components
Options to add:
– Add a component from the list
– Search for specific components
– Browse by component type
– Review component size and dependencies
Components in Outbound Change Sets
Metadata Types Supported:
- Apex Classes and Triggers
- Lightning Web Components (LWC)
- Aura Components
- Visualforce Pages
- Custom Objects and Fields
- Record Types
- Validation Rules
- Workflows and Flows
- Permission Sets
- Profiles
- Custom Settings
- Custom Metadata Types
- Static Resources
- And many more…
Dependency Handling:
When you add a component, Salesforce automatically identifies dependencies:
- If you add a Visualforce page that references an Apex class, the class is automatically included
- If you add a field, the custom object is automatically included
- If you add a flow, all referenced components are automatically included
Manual Component Selection:
Example Change Set: “New Service Cloud Features”
Components to add:
- Custom Object: “Service_Request__c”
- Automatically includes related fields
- Apex Class: “ServiceRequestHandler”
- Automatically includes referenced classes
- Flow: “Service_Request_Creation_Flow”
- Automatically includes all referenced objects/fields
- Permission Set: “Service_Team_Access”
- Custom Metadata Type: “Service_Config”
Salesforce will auto-include:
– Related custom fields
– Referenced Apex classes
– Objects and fields used by flows
– Any other dependencies detected
Outbound Change Set Best Practices
Practice 1: Logical Grouping
Group related components:
– Don’t mix unrelated features
– Create change sets around functional areas
– Example: One for “Inventory Updates”, one for “Reporting”
– Makes rollback easier if issues occur
Practice 2: Clear Naming
Naming Convention:
[Date]-[Team]-[Feature]-[Version]
Examples:
– 2024-01-15-Sales-QuoteEnhancements-v1
– 2024-01-15-Service-SLATracking-v2
– 2024-01-15-Integration-APIUpdates-v1
Benefits:
– Easy to identify what was deployed
– Chronological ordering
– Version tracking
– Team accountability
Practice 3: Document Dependencies
In Change Set Description:
“This change set includes:
– 3 custom objects: Order, OrderItem, Fulfillment
– 5 Apex classes: OrderProcessor, FulfillmentHandler, etc.
– 2 Flows: Order Creation, Fulfillment Tracking
– 1 Custom Metadata: Order Configuration
Dependencies:
– Requires Order__c custom object
– Requires Integration User profile
– Requires custom settings: ‘OrderConfig’
Testing Requirements:
– Run TestOrderProcessor (95% coverage)
– Run TestFulfillmentHandler (90% coverage)
– Manual testing: Create sample order end-to-end”
Practice 4: Validate Before Uploading
In Sandbox (source org):
- Create change set
- Test all components locally
- Run test classes: Ensure 75%+ coverage
- Check for errors in components
- Review dependencies
- Only then upload to target
INBOUND CHANGE SETS
Receiving and Deploying Changes in Target Org
An inbound change set is received in the target organization (typically production or another sandbox) and is available for validation and deployment.
What is an Inbound Change Set?
Definition:
A package of metadata components received in a target org from a source org, pending validation and deployment.
Characteristics:
- Received in target org
- Represents incoming changes from source org
- Available for validation before deployment
- Can be deployed or rejected
- Acts as a deployment staging area
Inbound Change Set Workflow
Step 1: Receive from Source Org
Once uploaded in source org outbound change set:
– Change set appears in target org’s “Inbound Change Sets” list
– Status: “Pending”
– Ready for validation
Step 2: Access Inbound Change Sets
Setup → Deploy → Inbound Change Sets
View:
– Change set name and description
– Source org
– Created date
– Components included
– Status (Pending, Validated, Failed, etc.)
Step 3: Validate Deployment
Before deploying:
Button: “Validate Deployment”
– Runs validation without actually deploying
– Checks all test classes (must pass)
– Verifies dependencies exist
– Identifies potential conflicts
– Returns validation report
– Checks for code coverage (must be 75%+)
Step 4: Deploy to Production
After validation passes:
Button: “Deploy” or “Rollback” (if previous deployment)
– Deploys validated change set
– Turns on switch in production
– Makes changes live to all users
– Sends confirmation email
– Records in deployment history
Validation Process
What Validation Checks:
- Test Execution
– Runs all test classes in target org
– Must pass all tests
– Must achieve 75%+ code coverage
– If any test fails: Deployment cannot proceed
- Dependency Verification
– Confirms all dependencies exist in target org
– Checks for required objects, fields, profiles
– Verifies custom settings are configured
– Confirms no missing components
- Conflict Detection
– Checks for conflicting customizations
– Identifies if component was modified in target
– Alerts to overwrite scenarios
– Flags potential data issues
- Code Coverage Analysis
– Calculates test coverage of Apex
– Ensures minimum 75% coverage
– Identifies untested code paths
– Reports coverage percentage
Deployment Process
Pre-Deployment Checklist:
Before clicking Deploy:
□ Validation passed successfully
□ All tests passed
□ Code coverage is 75%+
□ No conflicts identified
□ Stakeholders approved
□ Maintenance window scheduled
□ Rollback plan ready
□ Communication sent to users
□ Backup of current state
Post-Deployment Actions:
After deployment succeeds:
□ Verify changes in production
□ Run smoke tests on deployed features
□ Check error logs for issues
□ Monitor system performance
□ Notify stakeholders of success
□ Update documentation
□ Close deployment ticket
□ Conduct post-deployment review
OUTBOUND VS INBOUND – COMPARISON
Key Differences Side-by-Side
| Aspect | Outbound Change Set | Inbound Change Set |
| Location | Created in source org | Received in target org |
| Purpose | Package components for deployment | Receive and prepare for deployment |
| Action | Send/Upload to target | Validate and Deploy |
| Created By | Developer/Admin in source org | System (auto-created when received) |
| Naming | Developer decides name | Same name as source outbound set |
| Testing Location | Test in source org | Validation in target org |
| Test Classes | Verify locally | Must pass in target org environment |
| Dependencies | Auto-detected in source | Re-verified in target |
| Deployment Control | Upload/Send | Validate before deploy |
| Status Tracking | Creation, upload status | Validation, deployment status |
| Rollback | Upload alternate change set | Deploy previous version/rollback |
STEP-BY-STEP DEPLOYMENT EXAMPLE
Complete Deployment Walkthrough
Scenario: Deploying new Service Cloud features from Sandbox to Production
Phase 1: Development (Source Org – Sandbox)
Day 1-5: Development
– Developer creates custom object: Service_Request__c
– Developer creates Apex class: ServiceRequestHandler
– Developer creates Flow: Service_Request_Workflow
– Developer creates Permission Set: Service_Team_Access
– Local testing: All tests pass, 85% coverage
Day 6: Create Outbound Change Set
Location: Setup → Deploy → Outbound Change Sets
Create New:
Name: 2024-01-15-Service-CloudFeatures-v1
Description: “New Service Cloud features including…
– Service Request object with automation
– Team access permission set
– Workflow for case handling”
Add Components:
- Custom Object: Service_Request__c
✓ Auto-includes fields
- Apex Class: ServiceRequestHandler
- Flow: Service_Request_Workflow
- Permission Set: Service_Team_Access
Review:
✓ All dependencies included
✓ All tests pass (85% coverage)
✓ No conflicts
✓ Ready to upload
Upload to Target: Production Org
Status: Uploaded
Phase 2: Receiving (Target Org – Production)
Immediately after upload:
Change set appears in Production’s Inbound Change Sets
Status: Pending
Location: Setup → Deploy → Inbound Change Sets
View:
Name: 2024-01-15-Service-CloudFeatures-v1
Source: Sandbox org
Status: Pending
Components: 4
Created: Today 10:30 AM
Phase 3: Validation (Target Org – Production)
Day 7: Validation Phase
Location: Inbound Change Sets → Select Change Set → Validate Deployment
Validation Process:
- Run test classes in production environment
✓ TestServiceRequestHandler: PASSED (82% coverage)
✓ TestServiceWorkflow: PASSED (88% coverage)
- Verify dependencies
✓ Profile: Service_Team exists
✓ Custom Settings: All required settings configured
- Check for conflicts
✓ No conflicting customizations detected
✓ No component overwrites
- Code coverage check
✓ Overall coverage: 85%
✓ Minimum requirement: 75%
✓ All tests passed
Validation Result: SUCCESS
Status: Ready to Deploy
Phase 4: Deployment (Target Org – Production)
Day 7: Deployment Phase (During maintenance window, 2 AM – 4 AM)
Pre-deployment checklist:
✓ Validation passed
✓ Stakeholders approved
✓ Users notified
✓ Rollback plan ready
✓ Support team on standby
Deployment:
Location: Inbound Change Sets → Select Change Set → Deploy
Button: Deploy
Confirm: Yes, deploy this change set
Deployment Status:
Starting deployment…
Creating custom object…
Deploying Apex class…
Deploying Flow…
Assigning Permission Set…
Deployment completed successfully
Time: 2:45 AM (15 minutes)
Success: YES
Post-deployment:
✓ Changes are live in production
✓ Users can now access Service Request
✓ All workflows active
✓ Confirmation email sent
✓ Deployment recorded in history
Phase 5: Post-Deployment Verification
Day 7: Verification (4 AM – 5 AM)
Smoke Tests:
✓ Service Request object accessible
✓ Create new Service Request: SUCCESS
✓ Workflow triggered correctly
✓ Permission Set assigned to test user
✓ Reports show new data
Monitoring:
✓ Error logs: No Apex errors
✓ Debug logs: No issues
✓ System performance: Normal
✓ User access: Working
✓ API endpoints: Responding
All clear – Deployment successful!
Notify Stakeholders:
Email: “Service Cloud features deployed successfully
Production is ready for user access”
COMMON MISTAKES AND SOLUTIONS
Deployment Pitfalls and How to Avoid Them
Mistake 1: Including Too Many Unrelated Components
WRONG:
– Create one massive change set
– Mix Service Cloud, Sales Cloud, and reporting features
– 50+ components in single deployment
– If anything fails, entire deployment fails
PROBLEM:
– Difficult to identify issue if deployment fails
– Risky rollback (loses all changes)
– Hard to debug
– Testing becomes complex
CORRECT:
– Create logical, smaller change sets
– Group related components only
– 5-15 components per change set
– Easier to manage, test, and rollback
Mistake 2: Not Testing in Target Org Environment
WRONG:
– Test only in source (sandbox) environment
– Assume tests will pass in production
– Deploy without validation
– Trust that components are correct
PROBLEM:
– Different org configuration causes test failures
– Production data affects test execution
– Deployment fails when tests run in production
– Changes don’t go live
CORRECT:
– Always run validation in target org
– Let Salesforce re-run tests in production environment
– Check for code coverage in production context
– Verify all dependencies exist in target
Mistake 3: Missing Dependencies
WRONG:
– Manually select only main components
– Forget to include related objects/fields
– Don’t review auto-included dependencies
– Assume all dependencies are included
PROBLEM:
– Deployment fails: “Required field not found”
– Changes don’t work: “Referenced object missing”
– Validation fails: “Dependency error”
– Requires redeployment with missing components
CORRECT:
– Review auto-included dependencies carefully
– Test locally to ensure all dependencies are correct
– When adding a component, check what it depends on
– Validate shows dependency errors
Mistake 4: Poor Naming Conventions
WRONG:
– Name: “ChangeSet1”
– Name: “Updates”
– Name: “New_Stuff_Final_v3”
– Name: “CS20240115”
PROBLEM:
– Impossible to identify what was deployed
– Hard to track which version is which
– Confusing for team coordination
– Difficult troubleshooting
CORRECT:
– Use: 2024-01-15-Service-SLAUpdates-v1
– Include: Date-Team-Feature-Version
– Clear, descriptive naming
– Easy to track and find
Mistake 5: Deploying During Peak Usage
WRONG:
– Deploy at 2 PM (peak usage time)
– Don’t notify users
– Don’t schedule maintenance window
– Hope everything works
PROBLEM:
– Users experience errors during deployment
– Performance issues for active users
– Support team overwhelmed with questions
– Bad user experience
– Potential data inconsistency
CORRECT:
– Deploy during low-usage window (nights/weekends)
– Schedule maintenance window
– Notify users in advance
– Have support team on standby
– Monitor for issues
Mistake 6: Not Reviewing Validation Errors
WRONG:
– See validation warnings and ignore them
– Try to deploy with validation warnings
– Don’t understand error messages
– Hope deployment works anyway
PROBLEM:
– Deployment fails even though you deployed
– Changes don’t go live
– Users affected
– Credibility damaged
CORRECT:
– Read all validation error messages carefully
– Fix issues before deploying
– Understand what each error means
– Don’t deploy with errors or critical warnings
FINAL THOUGHTS
Inbound and outbound change sets represent Salesforce’s native approach to deployment, and mastering them is essential for any administrator or developer working with Salesforce. The distinction is simple but critical: outbound change sets are what you send, inbound change sets are what you receive and deploy.
The key to successful deployment isn’t just understanding these concepts—it’s establishing a disciplined process around them. Create thoughtfully grouped, well-documented change sets. Always validate before deploying. Run all tests. Check dependencies. Deploy during scheduled maintenance windows. And maintain comprehensive documentation and rollback plans.
Deployments can be high-stress events, but they don’t have to be. With proper planning, clear procedures, and adherence to best practices, deployments become predictable, safe, and routine. A well-executed deployment strategy means fewer errors, safer releases, happier users, and confident teams. That’s the power of understanding and properly implementing inbound and outbound change sets.